

Finished with the birthday party, but don’t want to throw away those lovely foil balloons? You don’t have to. This guide provides a simple, step-by-step process for deflating foil balloons so you can store and reuse them.
We cover the common straw method, what to do if you don’t have one, and how to properly care for your deflated balloons for the next celebration. It is a practical way to save money and keep memories from your special events for longer.
Why You Should Deflate and Reuse Your Foil Balloons
Before we explain the method, it is useful to understand the benefits of saving your foil balloons. It is more than just a clever trick; it is a smart choice for both your wallet and the environment.
Being a Smart Saver in Singapore
Planning a party in Singapore involves managing costs, and every dollar saved helps. High-quality foil balloons, also known as mylar balloons, are designed to be durable. They are not meant for a single use. By taking a few minutes to deflate foil balloons, you can easily save them for another child’s birthday, an anniversary, or a family gathering next year.
This simple action turns a one-time purchase into a lasting party supply, helping you allocate your budget to other important parts of the celebration. Think of it as an investment in future fun. A set of number balloons can be reused for milestone birthdays, and character balloons can be brought out again for a younger sibling’s party.
A More Environmentally Friendly Choice
We are all looking for simple ways to be more considerate of the environment. Reusing party decorations is an easy and effective step. When you reuse foil balloons, you reduce the amount of waste that ends up in landfills. These balloons are made from a type of plastic and metal film that does not break down quickly. Giving them a second or even third life significantly lowers their environmental impact. When the balloon finally reaches the end of its usability, you can then dispose of it, knowing you made the most of it. It is a small but meaningful contribution to reducing single-use consumption.
The Easiest Way: How to Deflate Foil Balloons with a Straw
The most common and straightforward method to deflate helium balloon designs or air-filled ones is with a simple drinking straw. The process is quick and requires no special skills.
What You Will Need
You likely already have everything you need at home. Gather these simple items:
- The Foil Balloon: The balloon you wish to deflate.
- A Drinking Straw: A standard plastic or reusable drinking straw works perfectly. A straw that is slightly firm is easier to insert. Coffee stirrers or bubble tea straws can also work well.
- Your Hands: For applying gentle pressure.
Follow these simple steps to safely and completely deflate your balloon.
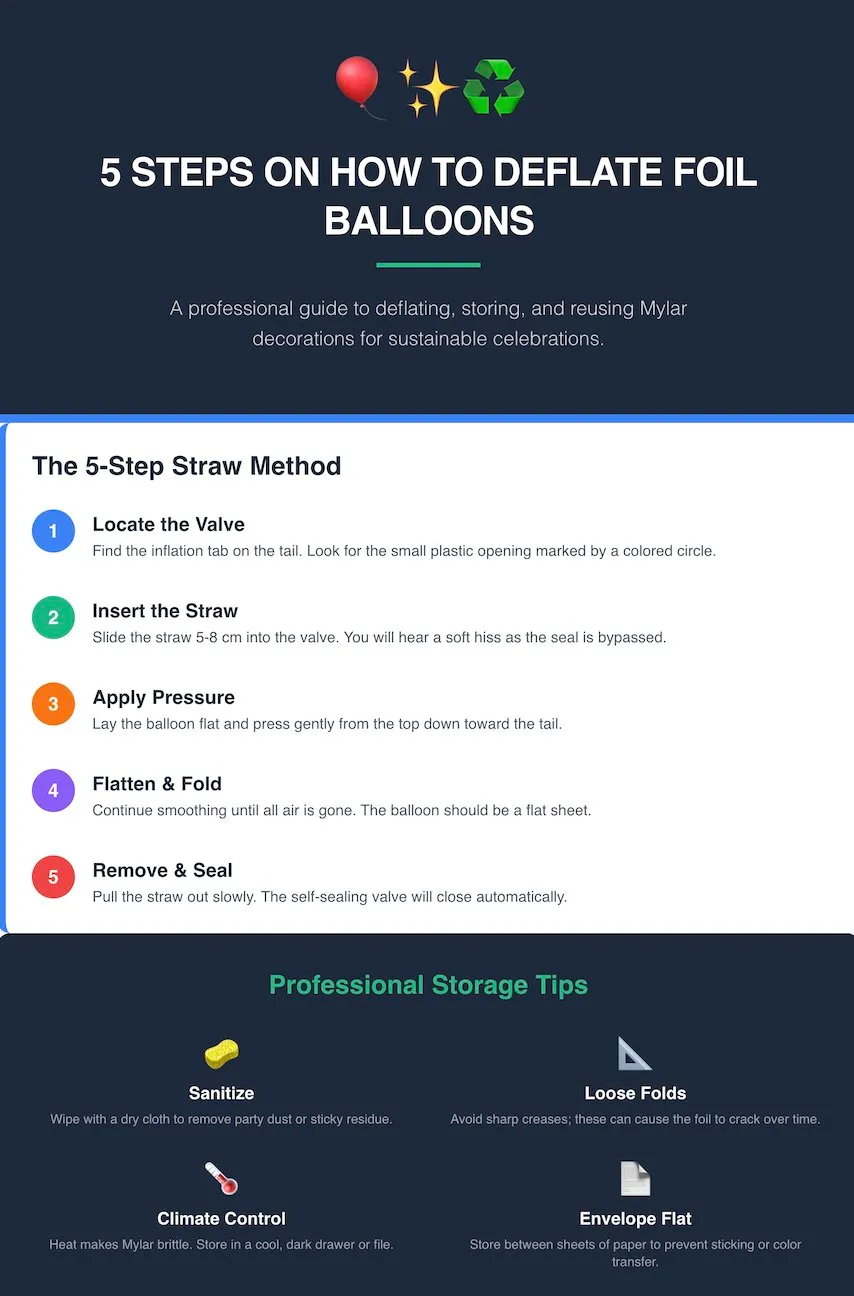
1. Locate the Sealing Valve
First, find the inflation tab on the tail of the balloon. This is the small flap of plastic where you initially inserted the pump or helium nozzle. On this tab, you will see a small opening, which is the entry point to the self-sealing valve. This clever valve is a thin plastic sleeve inside the balloon’s tail that automatically seals after inflation to trap the air or helium. The opening is usually marked by a small coloured circle or a slight separation in the plastic layers.
2. Gently Insert the Straw
Take your straw and carefully slide it into the opening of the valve. You will need to guide it between the two layers of plastic that make up the valve. Push the straw in gently. You should aim to insert it about 5 to 8 centimetres deep into the balloon.
As you push the straw past the seal, you will likely feel a slight pop or give, and you may hear a soft hiss. This is the sound of the trapped air beginning to escape. Be patient and do not force it; a gentle, steady motion is best to avoid damaging the valve. This is the key step to deflating a foil balloon with a straw.
3. Apply Gentle Pressure
Once the straw is in place and the air has started to release, you can speed up the process. Lay the balloon on a flat surface like a table or the floor. Place your hands flat on the body of the balloon, far from the neck, and begin to press down gently.
The pressure will push the remaining air or helium out through the straw. Work your way from the furthest edge of the balloon towards the tail, where the straw is. This ensures you empty it evenly. Avoid pressing too hard or too quickly, as this could put stress on the balloon’s seams.
4. Continue Until Flat
Continue applying light, even pressure, smoothing the balloon out with your hands as it deflates. You will feel and see it becoming completely flat. You can even fold sections over as they empty to help push the air out. The hissing sound will stop once all the air is out. The balloon should now look like a flat sheet of foil.
5. Carefully Remove the Straw
Once the balloon is fully deflated, hold the neck of the balloon with one hand and slowly pull the straw out with the other. The self-sealing valve is designed to close back up on its own, which will prevent air from getting back inside. Your balloon is now successfully deflated and ready for storage.
What to Do If You Don’t Have a Straw

If you cannot find a drinking straw, do not worry. Several common household items can work as effective substitutes. You just need to be a little more careful.
Finding a Suitable Alternative
Look for something that is long, thin, and relatively smooth. The ideal tool should be firm enough to push past the valve but not sharp enough to puncture the balloon. Good options include:
- The thin plastic tube from inside a ballpoint pen (make sure to remove the ink and clean it first).
- A plastic coffee stirrer.
- A thin knitting needle (use the blunt end).
- A deflated and straightened plastic balloon stick.
- A straightened paperclip (use this as a last resort and be extremely careful not to use the sharp end).
The Method for Deflating a Foil Balloon Without a Straw
The process to deflate a foil balloon without a straw is almost identical, but it requires extra care.
- Prepare Your Tool: Make sure your chosen substitute is clean and has no sharp edges that could tear the balloon. If using a pen tube, wash it out. If using a knitting needle, ensure you are only using the smooth, rounded end.
- Locate the Valve: Just as before, find the inflation tab on the balloon’s tail.
- Insert with Extreme Care: This is the most important step. Gently and slowly guide your tool into the valve. Because these items are harder than a plastic straw, there is a higher risk of tearing the delicate plastic valve. Do not force it. If you feel resistance, pull back slightly and try again at a slightly different angle.
- Press and Deflate: Once the tool is properly inserted and air is escaping, proceed with applying gentle pressure to the balloon’s body to push the rest of the air out.
- Remove the Tool Gently: When the balloon is flat, carefully slide the tool out. The valve should seal behind it.
Deflating Different Types of Foil Balloons
While the basic method is the same, some popular balloon types have unique shapes that are worth considering.
How to Deflate Foil Letter and Number Balloons
Large foil letters and numbers are very popular for birthdays and anniversaries. The good news is that they are just as easy to deflate as standard shapes. To deflate foil letter balloons, you simply need to repeat the process for each one. Every letter or number balloon is a separate unit with its own self-sealing valve.
Find the valve on each balloon, insert your straw, and press the air out. Because of their unique shapes, you may need to fold and press them in sections to get all the air out. For example, with the number ‘8’, you will need to deflate both the top and bottom loops. Be methodical, and they will be flat and ready for storage in no time.
Handling Large Shape and Character Balloons
Large balloons, such as those shaped like cartoon characters or animals, hold a lot more air or helium. They will naturally take a bit longer to deflate. The key is patience. Use the same straw method, but be prepared for a steady flow of air for a minute or two.
As the larger sections start to empty, you can fold them over to apply pressure and push the air from the extremities (like arms or ears on a character balloon) towards the straw. This ensures the entire balloon deflates evenly without putting too much stress on any single seam.
How to Properly Store Your Deflated Foil Balloons for Reuse
Proper storage is essential for ensuring your balloons are in perfect condition for their next use. Wrinkles and damage can occur if they are not stored correctly.
Preparing the Balloon for Storage
Once the balloon is completely flat, take a moment to prepare it. Use a soft, dry cloth to gently wipe down the surface. This removes any dust, confetti, or cake residue from the party. Make sure the balloon is completely dry before you fold it, as any moisture trapped inside the folds can cause the printed surfaces to stick together or grow mildew over time.
The Best Way to Fold Your Balloons
How you fold the balloon matters. Avoid making sharp, hard creases, as these can weaken the material over time and may even cause small cracks. The best approach is to fold the balloon loosely.
- Start by folding the sides inwards towards the centre, creating a neat rectangle or square shape.
- For long balloons, you can then fold them in half once or twice.
- For letter or number balloons, try to fold along their natural lines and shapes.
- The goal is to make them a manageable size for storage without creating tight folds.
This gentle folding technique helps preserve the balloon’s metallic finish and printed design, keeping it looking fresh for its next appearance.
Choosing the Right Storage Location
The final step is finding the right home for your folded balloons. When you store foil balloons, the ideal environment is a cool, dry place that is shielded from direct sunlight and extreme temperatures. Heat can cause the material to become brittle, and sunlight can fade the vibrant colours.
Excellent storage spots include:
- A flat file or large envelope.
- A drawer with other party supplies.
- A plastic storage box under a bed.
- Between the pages of a large book or magazine.
Properly stored, your balloons will be protected and ready for you to reinflate whenever you need them. Taking these simple steps for how to store foil balloons will make your future party planning even easier.
Reinflating Your Stored Foil Balloons

When it is time for the next celebration, bringing your stored foil balloons back to life is simple.
Checking the Balloon Before Reinflation
Before you begin to reinflate, take a moment to inspect the balloon. Carefully unfold it and lay it flat. Look over the surface and seams for any small tears or pinholes that might have occurred during storage or from its previous use. Most of the time, if you have stored it correctly, it will be in perfect shape.
The Reinflation Process
Reinflating is exactly the same as inflating it for the first time. You can use a hand pump for air or a helium tank for floating.
- Locate the self-sealing valve again.
- Insert the nozzle of your pump or helium tank into the valve.
- Inflate the balloon slowly until it is firm but not overly tight. Over-inflating can strain the seams.
- Remove the nozzle, and the valve will automatically seal itself.
It is worth noting that a foil balloon that has been used before may not float for quite as long when reinflated with helium. The material can stretch slightly after its first use, which can allow the very small helium molecules to escape a tiny bit faster. However, it will still float beautifully for your party. If you are just using air, it will last for weeks or even months. Knowing how to properly reuse foil balloons makes every celebration more sustainable.
Conclusion On Deflating and Storing Foil Balloons
At BearloonSG, we know that a celebration’s magic is in the details.
Learning how to deflate foil balloons is a simple skill that extends the life of your decorations, making every party both memorable and smart. By carefully deflating, folding, and storing your balloons, you ensure they are ready for the next happy occasion, proving that great party planning is all about thoughtful care.
At BearloonSG, we’re more than just Singapore’s favourite one-stop gift shop; we are your partners in celebration. Mastering simple tips like this empowers you to be a more resourceful party planner. When you’re ready for your next event, explore our wide range of customisable balloons, flowers, and gifts, all with free, fast delivery. We help you craft moments of joy that last.
Still have questions? Feel free to reach out. At BearloonSG, we’re happy to help you make every celebration perfect.
Frequently Asked Questions About How to Deflate Foil Balloons
Can You Really Deflate a Foil Balloon and Reuse It?
Yes, absolutely. Foil balloons are made with a durable material and a clever self-sealing valve that is designed for both inflation and deflation. This makes them perfect to reuse. As long as you are gentle during the deflation and storage process, you can use them multiple times.
How Do You Get the Air Out of a Self-Sealing Balloon?
You can easily get the air out by carefully inserting a standard drinking straw or a similar thin, blunt object into the self-sealing valve. The straw needs to go in about 5-8 cm to bypass the seal. Once it’s in, you can gently press on the balloon’s body to push the air out through the straw.
Do Foil Balloons Automatically Deflate Over Time?
Yes, they do, but the process is very slow. A helium-filled foil balloon can stay floating for a week or even longer, while an air-filled one can remain inflated for several weeks or months. The manual deflation method described here is for when you want to flatten and store them right after your party.
How Long Does It Take to Manually Deflate a Foil Balloon?
Manually deflating a standard 18-inch foil balloon is a very quick job. The entire process, from finding the valve and inserting the straw to having the balloon completely flat, typically takes less than one minute per balloon.
Can I Reinflate a Deflated Foil Balloon with My Mouth?
While it is physically possible to reinflate a balloon with air using a straw and your mouth, it is generally better to use a hand pump. Using a pump prevents moisture from your breath from getting inside the balloon. This moisture can sometimes cause the internal surfaces to stick together or lead to a musty smell during storage.
What Should I Do If I Accidentally Puncture the Balloon While Deflating It?
Don’t worry, a small puncture can often be fixed. A small piece of clear sticky tape placed firmly over the hole can create an effective seal. Press it down smoothly to ensure there are no air bubbles. This simple repair will allow you to successfully reinflate the balloon, especially if you are filling it with air for a wall decoration.